Lesson 2: Reopen and Modify a Saved Model File in the GUI
For this lesson, you will need a saved model file, preferably the one from the previous lesson.
As you just learned, a model file contains the commands that define your Java/.NET integration project. The code generator remembers all the modifications you make to a mode. When you save the model, you end up with a model file.
Frequently, you find yourself in the position of having to revisit an older model file to make some changes to the model. For example: you created a model file several months ago and you have been happily using it to generate .NET proxy types since. Now there is a new jar file that needs to be added to the model and instead of starting from scratch you want to make incremental changes to the existing model file.
For the remainder of this lesson we will assume that you are working with the model file you created in the previous lesson but any simple model file will do.
Step by Step Instructions From the Command Line
- Locate your model file.
You will need the full path to your model file.
- Launch the code generator with the model file as an argument.
Assuming you are still using the previous lesson's console window, you will still be in the code generator's
bin directory and don't have to change into it.
xmog "C:\Temp\Lesson 1.jmm"
./xmog "/home/alex/Lesson 1.jmm"
I always make it a habit to quote my filenames because they often contain spaces, which can
mess up the commandline parsing and lead to file not found errors.
- You should now see something like the screenshot below:
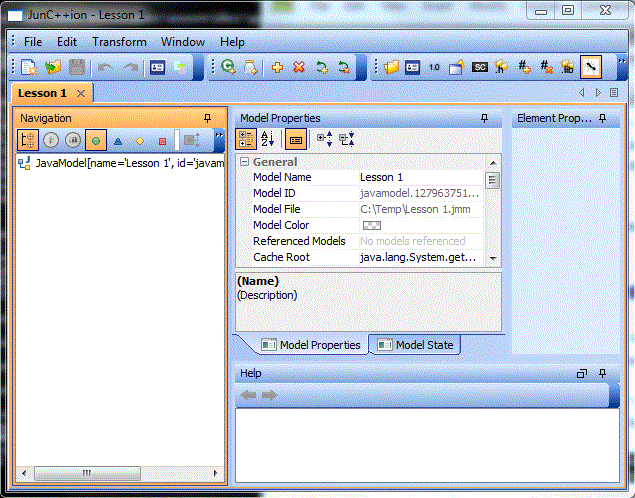
Note how the model has the proper name
that you assigned it in the first lesson. This is not a newly created model populated with default values, this is
the model that you had saved earlier.
Also note how the Model File property now contains the model file's full path. The code generator
maintains a synthetic read-only property called modelFile (and another one called modelDir)
that represents the location from which it loaded the model. You will learn later that you can use these properties
to create self-contained integration projects where input and output paths are specified relative to these properties'
values.
- Check out some additional model properties.
For now, we're not going to be changing any more properties, but we're going to look at how the changes we have made
have percolated through our settings. Scroll down the Model Properties pane until you get to the .NET section.
We will look at the Target Directory property first. We never changed it, so it still has its default value of
(modelDir!=null?modelDir:'.')+'/generated/dotnet/cs'.
modelDir is of course the directory to which this model file has been saved. If you hover your mouse pointer over the value, a tooltip should pop
up that displays that terp expression's resolved value.
As a programmer you should have no trouble interpreting this expression: take the value of modelDir (or the current directory if modelDir is not yet
defined), and append a subdirectory to it. In my case, I ended up with the value C:\Temp\generated\dotnet/cs.
Let's look at another interesting property. Please scroll a bit further to the Generate .NET Build Support
property. Click on the little plus icon in front of it to expand this hierarchical property. The very first child property
called Project Name is the one we're interested in. It also still has its default value of name[namefy].
Without going into too much detail, we applied a transformation called namefy to the model's name property.
Hovering over it yields the value Lesson_1.
Note: The namefy transformer replaces whitespaces and
characters that are not usually legal in names with underscores. It also collapses sequences of underscores.
- Experiment
Experiment a little bit by changing the Model Name and then checking what the Project Name resolves to.
Another interesting experiment is to play with the project name. You could for example convert the name to lowercase by
using the value name[namefy][lower]. You could go wild by doing something like
name[namefy][0..3][upper]+name[namefy][3..][lower]
What do you think would be the result?
By the way, check out the Model State pane after you're done experimenting. You will see lots of changes
that you made while experimenting. If you were to save now, you would always be dragging all of these changes along.
This demonstrates that at some point you will want to take a text editor and remove a bunch of extraneous commands
from your model file or even start a new model file from scratch.
We have found that the code generator GUI is great for initially defining the scope of the integration problem but
at some point you will probably just write a model file from scratch.
Step by Step Instructions From the GUI
- Start the code generator by running
xmog without arguments (see Lesson 1
if you have questions about how to do that).
- To reopen a preexisting model from the GUI, you have multiple options:
- The File menu maintains a list of previously open models. Locate the proper menuitem and open the model file that way.
- Choose "File - Open..." to browse for the model file you wish to open.
- Click the "File Open" toolbar button. It has a folder icon with a green arrow.
- Follow the instructions for Command line mode. From here on the two cases are identical.
Take-Away Points
- A model file can be reopened from the command line as well as from the GUI.
- New changes are added to the model.
- There are two special read-only properties called
modelFile and modelDir that represent
the model file and model file directory respectively. These properties cannot be modified but they can be used in
defining other model property values.
- Model property values are expressions in which you can reference other model properties by name. When you select a
model property in the Model Properties pane, the information field at the bottom will tell you its internal
name.
- You can use transformation commands like
[namefy] to remove
whitespace and non-ASCII characters in a smart way, or [upper]/[lower] to change the case, or
range selectors like [0..3] to select the first three characters of a string.
- You can hover your mouse pointer over model properties to see their evaluated value.
You will need the full path to your model file.
Assuming you are still using the previous lesson's console window, you will still be in the code generator's
bin directory and don't have to change into it.
xmog "C:\Temp\Lesson 1.jmm"
./xmog "/home/alex/Lesson 1.jmm"
I always make it a habit to quote my filenames because they often contain spaces, which can mess up the commandline parsing and lead to file not found errors.
Note how the model has the proper name that you assigned it in the first lesson. This is not a newly created model populated with default values, this is the model that you had saved earlier.
Also note how the Model File property now contains the model file's full path. The code generator
maintains a synthetic read-only property called modelFile (and another one called modelDir)
that represents the location from which it loaded the model. You will learn later that you can use these properties
to create self-contained integration projects where input and output paths are specified relative to these properties'
values.
For now, we're not going to be changing any more properties, but we're going to look at how the changes we have made have percolated through our settings. Scroll down the Model Properties pane until you get to the .NET section.
We will look at the Target Directory property first. We never changed it, so it still has its default value of
(modelDir!=null?modelDir:'.')+'/generated/dotnet/cs'.
modelDir is of course the directory to which this model file has been saved. If you hover your mouse pointer over the value, a tooltip should pop
up that displays that terp expression's resolved value.
As a programmer you should have no trouble interpreting this expression: take the value of modelDir (or the current directory if modelDir is not yet
defined), and append a subdirectory to it. In my case, I ended up with the value C:\Temp\generated\dotnet/cs.
Let's look at another interesting property. Please scroll a bit further to the Generate .NET Build Support
property. Click on the little plus icon in front of it to expand this hierarchical property. The very first child property
called Project Name is the one we're interested in. It also still has its default value of name[namefy].
Without going into too much detail, we applied a transformation called namefy to the model's name property.
Hovering over it yields the value Lesson_1.
Note: The namefy transformer replaces whitespaces and
characters that are not usually legal in names with underscores. It also collapses sequences of underscores.
Experiment a little bit by changing the Model Name and then checking what the Project Name resolves to.
Another interesting experiment is to play with the project name. You could for example convert the name to lowercase by
using the value name[namefy][lower]. You could go wild by doing something like
name[namefy][0..3][upper]+name[namefy][3..][lower]
What do you think would be the result?
By the way, check out the Model State pane after you're done experimenting. You will see lots of changes that you made while experimenting. If you were to save now, you would always be dragging all of these changes along. This demonstrates that at some point you will want to take a text editor and remove a bunch of extraneous commands from your model file or even start a new model file from scratch.
We have found that the code generator GUI is great for initially defining the scope of the integration problem but at some point you will probably just write a model file from scratch.
xmog without arguments (see Lesson 1
if you have questions about how to do that).
- The File menu maintains a list of previously open models. Locate the proper menuitem and open the model file that way.
- Choose "File - Open..." to browse for the model file you wish to open.
- Click the "File Open" toolbar button. It has a folder icon with a green arrow.
modelFile and modelDir that represent
the model file and model file directory respectively. These properties cannot be modified but they can be used in
defining other model property values.
[namefy] to remove
whitespace and non-ASCII characters in a smart way, or [upper]/[lower] to change the case, or
range selectors like [0..3] to select the first three characters of a string.