Lesson 6: Import Your Own or Third-Party Java Types
In Lesson 3 we learned how to import
built-in Java types, i.e. Java types that come with your Java Runtime Environment (JRE). We did not have to specify the files from
which the type definitions were loaded because the code generator knew how to locate them in the
configured JRE's bundled .jar or .jmod files.
In this lesson, we are going to import Java types that are not built-in. They might be Java types that come in third-party jar files or they might be Java types that your own organization has developed and now wants to use from .NET.
Not only do we have to tell the code generator which types we're interested in like in the built-in type case, we also have to tell it where to find the type definitions. There are at least two possibilities for doing this:
- We could simply point at a directory or a
.jarfile and say: "Get me all the Java types from here!" - We could append directories or
.jarfiles to the model's search path, then all the Java types located in those new search path roots would become available for import by name or pattern, just as if they were built-in types.
The code generator actually supports both ways of importing external types. Let's take a look at the code generator
GUI again:
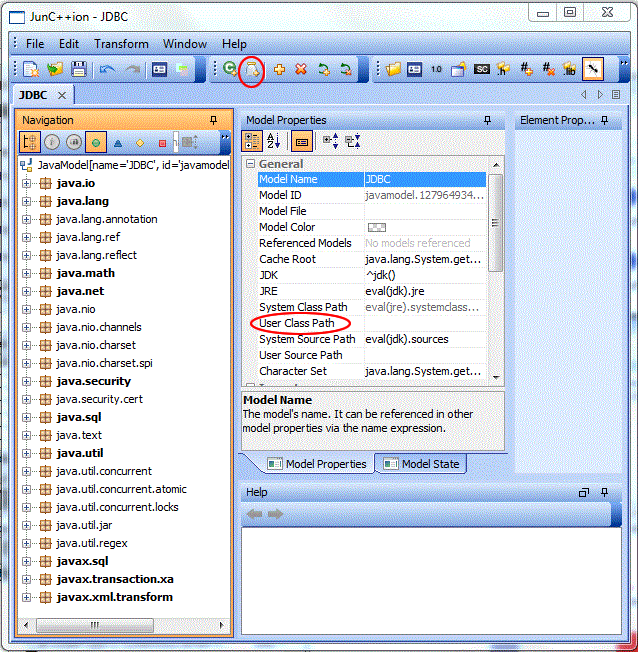
You can see two red ellipses that highlight the user interface elements dealing with external Java types. Let's take a look at the model property "User Class Path" first. The user class path represents the search path where the code generator looks for external Java types. Let's discuss some class path basics first. Feel free to skip the next section if you are familiar with Java and how it locates Java types. We provide this background information here because many of our customers come from the .NET side and are not familiar at all with Java.
How a Class Path Works
The Java runtime loads Java types dynamically as it needs them. In general, types are loaded from something called
a class path. It is Java's equivalent for the native PATH which defines where the operating system
goes looking for executables when you don't specify a full path.
The class path is simply a list of so-called class path roots, files and directories in wihch the Java runtime will go looking for types.
While developers can define their own mechanisms to look for types, by default Java supports three different kinds of filesystem-based class path roots:
- a directory which is expected to contain
.classfiles in a well-defined subdirectory hierarchy that reflects the packages in which the types are declared, - in a
.jarfile that bundles many.classfiles in a compressed format, - in a
.jmodfile that is conceptually similar to a
When you want to tell Java to load a non-built-in Java type, you have to give it one or more of
these class path roots in which to locate its definition. Java will expect a type's bytecode
(.class) file in a well-defined place relative to the given class path root.
Consider the type javax.jms.Message as an example.
If we want to locate this type in a .jar file called jms.jar, its bytecode needs to be contained in
an entry called javax/jms/Message.class. Java would not be able to find the type if it were in an entry
called types/javax/jms/Message.class. Instead, Java would expect that entry to contain the bytecode for
a type named types.java.jms.Message.
The situation is very similar with so-called loose types that are stored in .class files in a
directory. To find the type javax.jms.Message, a file called Message.class needs to be located
in a javax/jms subdirectory of the directory that is configured as part of the search path. It is actually
one of the most common configuration errors for Java beginners to configure the directory containing the .class
files as the class path rather than the directory containing the subdirectories that represent the type's package names.
Alternative 1: Step by Step Instructions (User Class Path)
- Start the Code Generator GUI.
We are assuming that you are still in the code generator's
bindirectory and don't have to change into it.xmog
./xmog
You should now see an empty Java model in the code generator GUI.
If not, please press the button on the right to debug your code generator installation.DEBUG - Try to Import the JMS Types From Class Path
The JMS types are not part of the standard J2SE distribution, so this should fail. We're just doing this to show you that the types will have to be supplied somehow.
Press the
 toolbar button or use the Import Typ(s) From Class Path menuitem from the Edit menu to open the Import dialog.
Enter
toolbar button or use the Import Typ(s) From Class Path menuitem from the Edit menu to open the Import dialog.
Enter javax.jms.*in the Include field and press OK.Your model should remain empty. Technically, what you just did is not an error, even if it might feel like one. You asked for all the types in the
javax.jmspackage and the code generator gave you all zero of them that it could find. - Add the JMS Types to the User Class Path
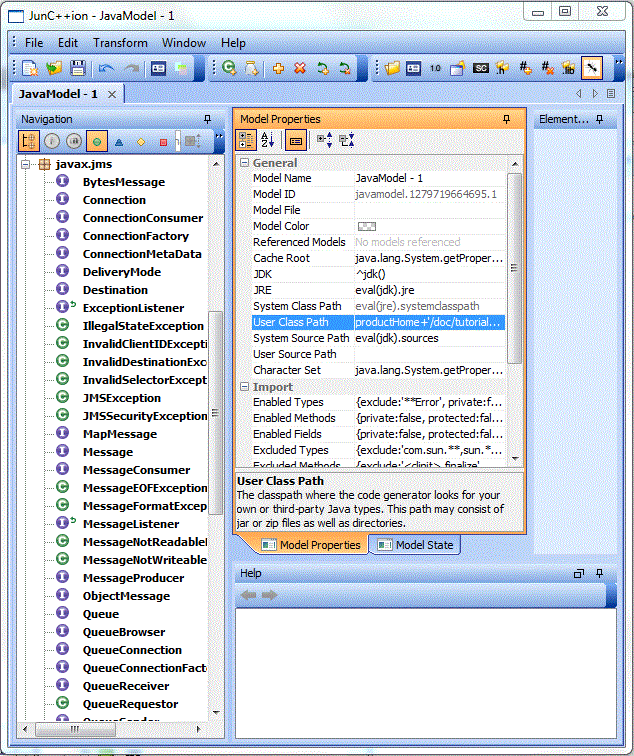
As part of the code generator download we include a .jar file that contains the JMS types. It is located in the
thirdparty/jms/jms-2subdirectory. But rather than hard-coding the path to where your code generator is installed, we are going to use a terp expression.Click on the User Class Path model property to edit its value. Enter the following:
productHome+'/thirdparty/jms/jms-2/jms.jar'
This expression uses the (rarely used)
productHomeproperty, which the code generator sets to its installation's root directory. Once you hit Enter or click somewhere else, you should be able to hover over the field and see what the code generator makes of this expression.In cases where you want to add your own
.jarfiles to the User Class Path, we recommend that you stage all of the files into a directory relative to your model file, for example alibdirectory that is in the same directory as your model file. Then you can add all of them to the model via one simple expression:modelDir+'/lib/*.jar'
Try Again to Import the JMS Types
Press the
toolbar button or use the Import Typ(s) From Class Path menuitem from the Edit menu to open the Import dialog.
Enter javax.jms.*in the Include field and press OK.Your model should now populate with types and you should see something like this:
You can use expressions and patterns and you can add more than one entry to the user class path. Simply separate different entries by a semicolon.
We recommend that you keep it simple and follow the strategy of staging all required Java input files in one place and then selecting all of them by wildcard pattern. That is less error-prone than maintaining a list of file names that represent a subselection from a larger group of files. Remember: adding them to the classpath is not the same as importing them. It just lets the code generator find them when you import the types you are interested in by name or selector.
Alternative 2: Step by Step Instructions (Import from File)
- Close and Reopen Your Code Generator GUI
We want to start with a clean slate to make sure we don't accidentally pick up results from our first run.
- Import the
jms.jarFileClick the
 toolbar button or type
 Ctrl-Fto import Java types from files that are not (yet) part of the model class path.You should see a File Open dialog like the one below:
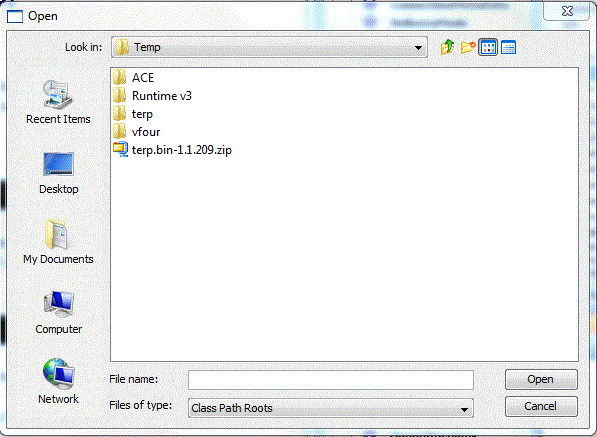
Browse to the code generator's
thirdparty/jms/jms-2directory, select thejms.jarfile and press the Open button.You will see the model populated by all types contained by the
jms.jarfile as well as by referenced types.You will also notice that the User Class Path property now contains an entry for the imported
.jarfile. The entry is a hard-coded jar file path, something we'll revisit again. - Take a Look at the Model State
When you switch to the Model State pane, you will see that your import command has been persisted as something similar to this:
^javamodel(){id:'javamodel.1279725344170.1'}).import(
    {include:'**'},
    ^f('C:/vfour/thirdparty/jms/jms-2/jms.jar')
);
When you compare that to the import commands used to import types by name you will see that it is the same command with a second argument that specifies the file(s) to import.
Take-Away Points
- We used the term model class path for the first time. The model class path is not a real model property. Think of it as the union of the system class path that is usually derived from the model's JRE setting, as well as the user class path. It is the complete path where the code generator will look for Java types by name.
- You learned two different styles of adding external (non-built-in) Java types to a model. They produced very similar
if not identical results but they are very different in the intent you communicated to the code generator. In the first case
you just added the
.jarfile to the model class path and then asked for specific types by name.In the second case you asked for all the types in the
.jarfile.The results looked identical because the name pattern we used in the first case perfectly described the types in the
.jarfile. If the.jarfile had contained additional types in different packages, the outcomes would have been very different.Which way is better?
It really depends on your use case. Sometimes you want all types in a jar file, no matter what they might be, enabled in your model. Sometimes you know that the
.jarfile could contain many types in addition to the ones you want enabled. We tend to prefer the first alternative because it is less likely to pick up unnecessary types and, when using name patterns with wildcards, still dynamically adjusts to newly added types that we probably want enabled. - Regardless of the alternative you end up using, use expressions rather than hard-coded filenames. Our experience has shown time and time again that you want your modelfile location independent. Make your model expect class path roots in a location relative to itself as described in the first alternative.