Lesson 1: Create a Model File (.jmm)
As already shown in the Code Generator Introduction,
the code generator's transformation workflow looks like this:
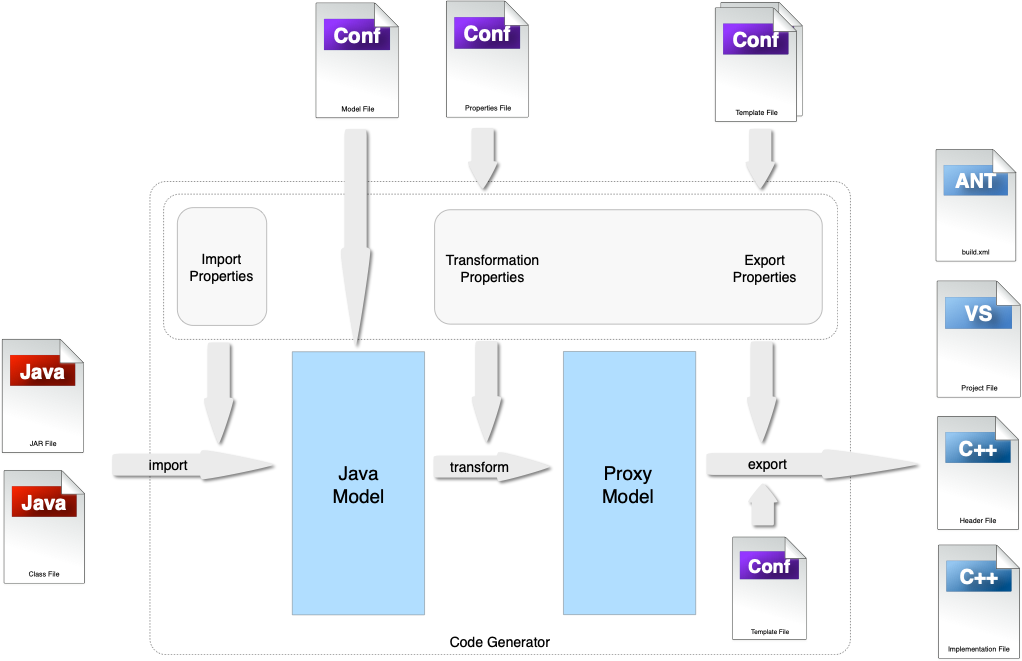
One of the most important inputs in that workflow is the model file (.jmm file). Think of a model file as the definition of your Java/C++ integration problem. Technically speaking, a model file is a terp script whose evaluation results in a Java model instance (terp is Codemesh's proprietary scripting language).
Practically speaking, a model file is something that records all the changes and edits that you make to a model in the code generator GUI.
When you run the code generator GUI without arguments, you get an empty integration model that is initialized with default
values. It might look something like this:
You can see a Navigation Pane that contains just the empty model root on the left side of the model window and a Model Properties Pane that contains all th default-initialized model properties. In particular, you can see the model's name, which was initialized to "JavaModel - 1". Let's change that value to a more meaningful name.
Step by Step Instructions
- Verify That Code Generator Can Run
For many users this will be the first time they try to run the code generator, so let's make sure it works!
To start the code generator, open a console window, change into the installation's bin directory and run the batch (xmog.bat) or shell script file (xmog). Use the batch file on Windows systems and the shell script file on all other platforms. Your directories will likely be different but the following snippets should make clear what you need to do on your system.
We will ask the code generator for its version number. This simple operation is implemented to execute some of the internal machinery and makes for a great smoke test to verify that the code generator is properly installed and that it can find everything it needs to run, at least in command line mode.
cd C:\Program Files\junc++ion-4.8.429\bin
xmog -version
cd /opt/junc++ion-4.8.429/bin
./xmog -version
You should see a version message in your console window.
Please click the button on the right if you do not see the expected version message to help you with debugging the issue. Feel free to call us if the problem persists.DEBUG - Start the Code Generator GUI
To start the code generator, run
xmogwithout the-versionargument. Assuming you are still in the code generator'sbindirectory, simply type:xmog
./xmog
You might be asked to agree to the evaluation license agreement if you have never run the code generator before. Please read and accept (you already accepted this license before you downloaded). The code generator might ask to download the runtime library. You will need your download credentials and write privileges for the code generator installation for the runtime installation to work. If you don't have both, just skip this step. Finally, a GUI window similar to the one shown in the above screenshot should display.
If the expected window does not open in a reasonable amount of time please click the button on the right to help you debug the issue.DEBUG - Change the Model's Name
Click in the value for the "Model Name" model property to get a property editor. You should see a blinking cursor and can now type your desired model name. That name should be descriptive of the model's purpose. We'll keep it simple and type Lesson 1 and hit the Enter key.
Once you hit the Enter key, the code generator recognizes that you made a change, so the "Save model" toolbar button (it has a floppy disk icon) is now enabled, as are the "File - Save Model" and "File - Save As" menu options.
- Save the Model
But before we do this, please note that the Model File property value is empty. This means that the code generator is aware that the model is newly created and not loaded from your file system.
Now click the floppy disk icon in the toolbar or choose one of the File Save menuitems and select a directory to which you want to save it. Press Save.
When you now look at the Model File property, you will see that it contains the file name you chose as a read-only value now.
- Let's look at the saved model.
Locate the saved file and open it in your favorite text editor. When I looked at the file on my system, it had the following contents:
^javamodel({id:'javamodel.12796327196.1'}).setmodelproperty('name', 'Lesson 1');
^javamodel({id:'javamodel.12796327196.1'})
You can also click on the Model State tab (you always either look at the model properties or at the state) and compare the model state with the contents of your saved file. They should of course be identical.
But what does it all mean? The contents of a model file are explained in greater detail in the Modelfile Reference but let's do quick run-through here.
Every line starts with a
^javamodel({id:'javamodel.12796327196.1'})expression. This is a terp expression that stands for: locate or create a model with the computer-generated unique identifier'javamodel.12796327196.1'. The first time this expression is encountered, a new Java model with the desired unqiue identifier is created. The second time and every subsequent time this expression is encountered, the already created Java model instance with the given unique id is returned.In the first line we see the edit that we made to the model. We changed its name to "Lesson 1." This edit got persisted as a terp expression that invokes the
setmodelproperty()command on the Java model instance.All model modifications that you make are recorded in this basic way. Again, please see the Modelfile Reference to learn more about model properties and commands.
But why is there no change for the
modelFileproperty? It changed when we saved the model to the file system. ThemodelFileproperty is special in that it always implicitly takes the value of the file from which the model was opened or to which it was saved. Therefore its value is not recorded as a change. - Now Change the Model's Name Again
Make another edit to the model name. Let's be creative and call it "Lesson 2." After you hit Enter, take a look at the Model State again. You will find this:
^javamodel({id:'javamodel.12796327196.1'}).setmodelproperty('name', 'Lesson 1');
^javamodel({id:'javamodel.12796327196.1'}).setmodelproperty('name', 'Lesson 2');
^javamodel({id:'javamodel.12796327196.1'})
Both changes have been recorded with the second name change overriding the first one because it is executed later.
This is an important lesson: changes are cumulative and the sequence of changes can matter.
- Close the Code Generator
This concludes the first lesson and we want to start with a fresh code generator for the next lesson. Please do not save the changes to your model when you exit the code generator.
Take-Away Points
This was not a complicated lesson, but you should have learned some important facts about the code generator:
- The code generator GUI is launched through script/batch files called
xmogthat are located in the product'sbindirectory. - There were some sick minds at work here. Who came up with the name
xmog?When we created the original code generator two decades ago, we were inspired by "Calvin and Hobbes" transmogrifier gun. We decided to go easy on our users and use
xmoginstead oftransmogrify. - A model file is a terp script that records all modifications made to an integration model in the code generator GUI.
- A model file is a plain text file that can be created, viewed, and edited in a text editor.
- There is an implicit model property called
modelFilethat always has the name of the file from which the model was loaded or to which you saved it as its value. - A model file does not contain all the property values that you see in the model view. It only records the changes that you made.